3. Navigating Gadi File Systems#
Overview
Tutorial: 30 min
- Objectives:
Learn how to use the Gadi terminal.
Learn how to navigate the filesystem.
Learn how to manage files and directories.
Learn how to copy files to and from Gadi.
This page introduces essential commands to get you started on Gadi. For a more detailed guide, see the Linux Command Quick Reference. If you are completely new to Linux, we recommend you to go over the The Unix Shell first.
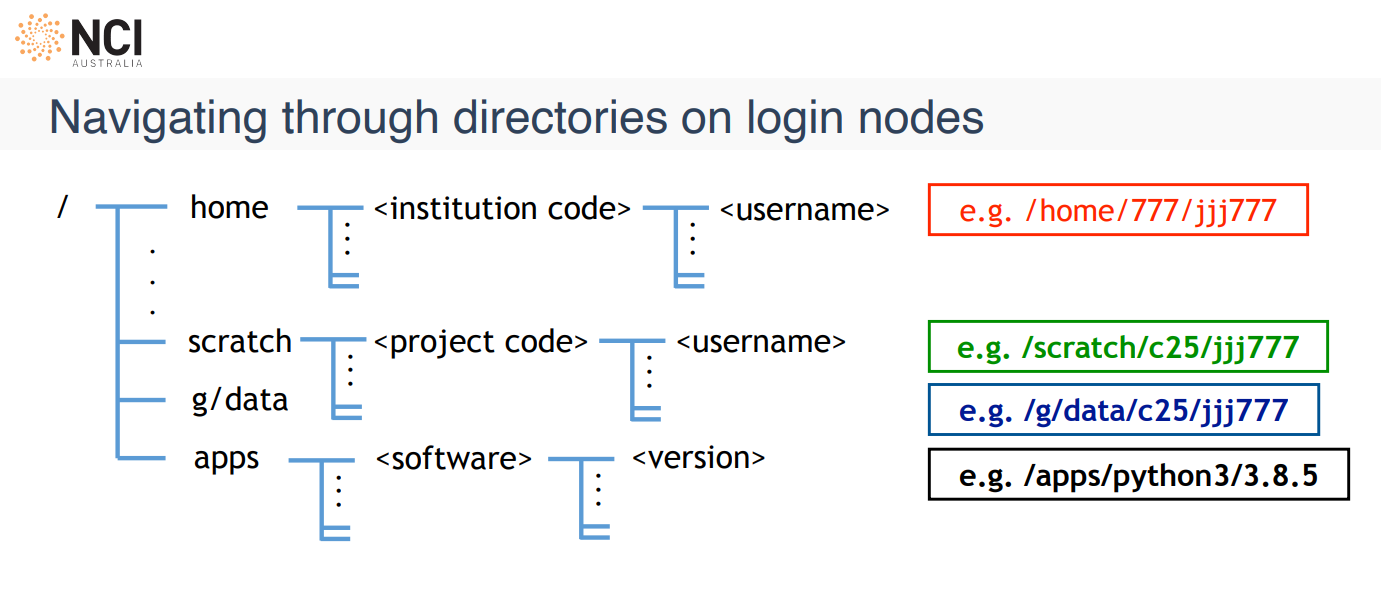
3.1. Gadi File Systems#

Location |
Purpose |
Backup / Quota |
Notes |
|---|---|---|---|
/home |
Personal user storage |
Backed up 10 GiB per user |
Store important and hard-to-reproduce files. Meant for config and critical content only. |
/scratch |
Temporary project storage, high performance |
Not backed up Project quota 100 days expiry |
Fastest storage. Temporary: files deleted after 100 days of no access. Use for raw experimental output. |
/g/data |
Persistent project storage |
Not backed up Project quota |
Long-term storage for datasets, code, and results. Allocations are set per project through stakeholder entitlements. RAID redundancy protects data integrity on disk, but no storage is guaranteed forever—projects must manage their data over the life of their allocation. |
JOBFS ( |
Fast, local scratch during a job |
Not backed up Per-job limit |
Local disk on the compute node, available only while the job runs. Request with |
/apps |
NCI Third-party software catalogue |
Managed by NCI Read-only |
Contains installed software modules and applications for all users. |
Location |
Purpose |
Backup / Quota |
Notes |
|---|---|---|---|
massdata (MDSS) |
Archival storage |
Backed up Project quota |
Massdata is an integrated system of front-end servers, disk cache, and tape archive. There is no |
Most workflows use a combination of these systems rather than relying on one alone. For example, you might stage inputs from /g/data into /scratch or JOBFS for a job, write outputs back to /g/data, and archive finished datasets to massdata. Effective job scripting is about orchestrating these resources, not picking a single filesystem and stopping there.
Knowledge Check 1: The Storage Dilemma
Scenario: You have a 500GB dataset that you need to analyze over the next three days. You plan to run 10 different jobs against this data.
Question: Which file system should you store the data in while the jobs are running, and why?
A) /home: Because it is the most secure.
B) /scratch: Because it is high-speed and designed for large-scale temporary usage.
C) /g/data: Because it is where my project is hosted.
Show answer
Answer:
B) /scratch. While /g/data is great for persistent project storage, /scratch is optimized for the high-speed I/O (Input/Output) required during active job execution. For very I/O-intensive work within a single job, you might also use JOBFS via $PBS_JOBFS. When you are done, move results you want to keep back to /g/data.
3.2. Understanding your location (pwd)#
Your current directory is where terminal commands run. pwd (print working directory) shows its full path.
pwd
3.3. Listing files (ls)#
General syntax of a command:

ls lists files and folders in the current directory.
Detailed list view with permissions, size, and timestamps:
ls -l
Human-readable sizes (easier when checking large files):
ls -lh
Show hidden files (names starting with .):
ls -a
Hint
Use ls --help anytime you need option names and short descriptions.
3.4. Practice: Find your bearings#
Exercise
Find out what directory you are in and list the files and directories there.
Then list contents with sizes in a human-readable form, sorted by size. Hint: check
ls --helpfor sorting options.
See solution
pwd
ls
cd /scratch/vp91/$USER
ls -lhS
3.5. Changing directory (cd)#
Move to an absolute path:
cd /path/to/directory
Go up one level:
cd ..
Jump to your home directory:
cd ~
3.7. Managing files and directories#
mkdir: create a directory
mkdir test
touch: create an empty file (or update a file’s timestamp if it exists)
touch test.txt
rm: delete files (no “rubbish bin” on the cluster — see the warning below).
Remove one file:
rm test.txt
Remove a directory and everything inside (use carefully):
rm -rf test
cp: copy files or directories
Copy file1 to file2:
touch file1.txt
cp file1.txt file2.txt
Copy a directory recursively:
mkdir dir1
cp -r dir1 dir2
mv: move or rename files and directories.
Rename file:
mv file1.txt renamed.txt
Move a directory inside another directory:
mv dir1 dir2
Delete with caution
There is no Trash folder to restore from once a file is removed. Backup tools exist, but rely on backups you made yourself — there is no guarantee of recovery here. Prefer rm on copies or test folders until you’re confident.
3.8. Viewing and editing text#
cat: print whole file contents to the terminal:
cat file.txt
less: scroll through a large file interactively (press q to quit):
less file.txt
nano: simple terminal editor:
nano file.txt
vim: more powerful modal editor:
vim file.txt
Note
These are some of the options available for managing and editing files on Gadi. You can also use other tools such as Emacs or IDEs like VS Code.
3.9. Practice: Create, inspect, tidy up#
Exercise
Under /scratch/vp91/$USER:
Create a directory called
hello_world.Create a file
hello_world/hello_world.txtand putHello, World!inside it (your editor choice, or redirect fromechoif you prefer).Display the contents in the terminal, then delete the file and folder when you’re done.
See solution
cd /scratch/vp91/$USER
mkdir hello_world
# or using nano, vim, or another editor:
# nano hello_world/hello_world.txt
echo "Hello, World!" > hello_world/hello_world.txt
cat hello_world/hello_world.txt
rm -rf hello_world
3.10. Copying files to and from Gadi (scp)#
scp copies files over SSH—useful for moving scripts or outputs between your laptop and Gadi.
Copy from your computer to Gadi:
scp local_file YOUR_USERNAME@gadi.nci.org.au:/remote/path/
Copy from Gadi to your current local folder:
scp YOUR_USERNAME@gadi.nci.org.au:/remote/path/file .
Note
Another option is to use rsync. Unlike scp, which copies files in full each time, rsync transfers only the changed portions of files, making it more efficient for large or frequently updated datasets.
3.11. Practice: Prepare the code for your first job on Gadi#
Exercise
Create
/scratch/vp91/$USER/first_job.Save hello_mpi.c onto your laptop, then upload it into
first_jobwithscp(adjust paths and username to match yours).